What are the differences between the Caponord and Futura dashboards?
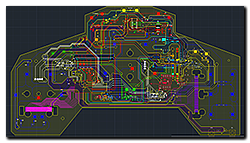 Since October/November 2012 it’s been possible to reprogram the dashboards and CAD/circuit diagrams have been available to help us repair them, but can we mix dashboard inlays to make a hybrid? ….. a Futonord, a Capotura or a Franken-Capo (my favourite!) dashboard if you will. Here I’m hopefully going to explain in more detail the differences and steps needed to create your own hybrid with spot-on needle calibration.
Dashboard basics
The Caponord dashboard has 9 part numbers covering different parts of the world. But they can simply be broken down into metric or imperial and for the EU, UK or USA markets. Other variants within those markets are simply differences in the bezel colour – grey, black or silver. Inside they all use the same circuit board although to date (June 2013) I have seen 6 different revisions of two distinct versions. However in terms of operation and display, they all do exactly the same thing.
So putting the case, lens and seal aside let’s firstly consider the differences in the inlay panels used. Over the life of the Caponord/Futura, three distinctly different inlay panels 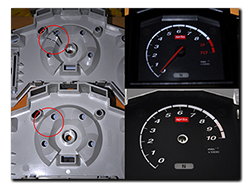 have come to light. The principle difference is in the tachometer ‘Red Zone’. The earliest inlays had an almost invisible red area because the red ink was applied after the white, the plastic moulding also had no distinct separation of the blue and red illumination and this leads to the colours bleeding into one another. Later mouldings had a plastic divider, one of which was removed at manufacture to differentiate the Futura ‘Red Zone’ from the Caponord, this preserves the separation of the red and blue illumination. Another version has an orange zone in place of the red ….. this may be the middle variant of the three, but that needs to be verified. The key thing to note here is that whichever inlay you have, the Kmh, Mph and tachometer graphics will be the same, they never changed throughout the life of the bike.
Graphic differences
Caponord/Futura Speedometer
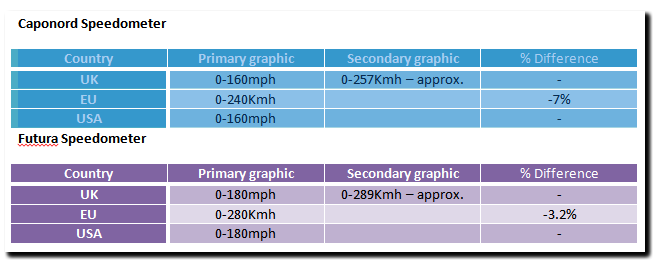
From the tables above we can see that the EU versions have a lower indicated top speed than any of the other inlays …….. And that can present a problem, primarily for the unwary Caponord owner.
Several times I have come across a UK owner who says that their bike is in miles-per-hour but has the temperatures in Centigrade. Let’s make one thing clear from the start – NO DASHBOARDS WERE SOLD THAT WAY! Clear?
Either this board has been reprogrammed (only likely post 2012) or is in fact a standard EU board with a UK inlay fitted to it. How can you tell? Compare it against a GPS – cover a measured mile, does the trip meter increase by 1 (then its recording miles) or 1.6 (recording Kilometre’s)? While you’re at it compare the GPS speed with the speedometer ….. If it’s an EU board, your Mph will be over-reading by approximately 7% ON TOP of the in-built error. Overall your speedometer could be as much as 10-15% out!
This was a common ‘conversion’ by owners and dealers alike when bringing Caponord’s into the country ……..
Caponord/Futura Tachometer
No apparent difference between versions as fitted to either the Caponord or Futura throughout their lives, however they are of course, different between the bikes.

Making the Hybrid
So I want to add a Futura inlay ( 180mph/12k rev limit) in place of the standard inlay as fitted to a UK Caponord. Simple, swap the inlay over ….. button it up and have a cold beer, right? Wrong! Without recalibration the Tachometer will read 6,200rpm when it should read 5,000rpm and the speedometer will be out by almost 20%! Here is a graphic comparison of the two speedometers.
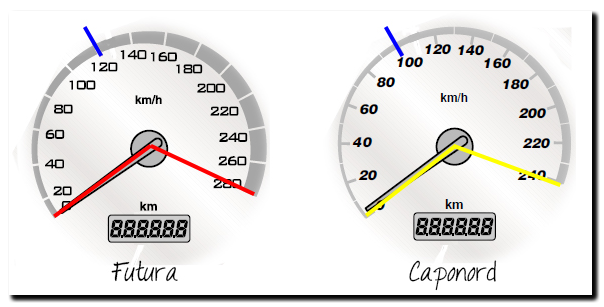 The blue line represents the error in readings if the board is left uncalibrated. Below is a comparison of the tachometer.
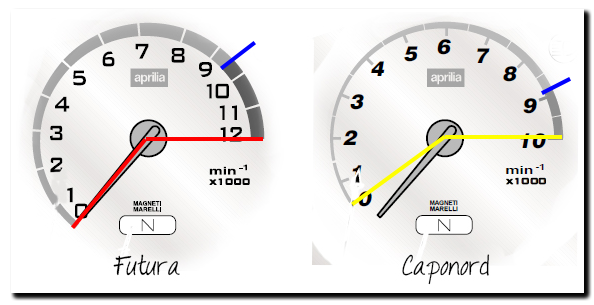 Here the blue line represents the start of the ‘Red Zone’ and the position of the divider in the plastic moulding. So how is the circuit board calibrated to the inlay then?
Calibration
Calibration is carried out by four blocks of data stored on the 24C02 IC, residing at memory locations 2CH – 2FH. The following table outlines the four variations, two Capo, two Futura for Mph and Km/h. Select the correct data range for the inlay to be used and your speedometer and tachometer should operate just fine.

If you need to ask how to locate, remove and reprogram this chip, then sorry I’m not the guy to help you. Why? Because it’s all to easy to screw up a perfectly good dashboard if you’re not competent to work on it …. and I haven’t got the time to teach you to solder and program eeproms by email, sorry! So either find a helpful electronics guru or ask on the AF1 forum for assistance.
Unfortunately, to date (June 2013) I’ve not been able to clarify how these calibrations actually work. With the arrival of winter and some dreary days, I’ll dig out the dashboard test-rig and play with these data blocks to see what happens. Theoretically, I should be able to calibrate for a 200mph/20,000rpm Caponord!
Proof and conclusion
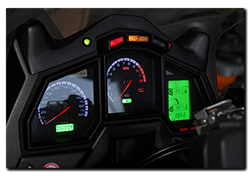 So after all the theory, hot-air and rhetoric, did it work? Happily it did, and here’s the outcome. One Caponord board with green lighting upgrade and a USA Mph inlay kindly donated by Arv of White Plains, New York. Calibration was checked against my Garmin 2820 and at a steady 60mph indicated, was logging a consistent 59.1mph on the GPS. An error of 1.5%. Comparing the dashboard trip against the GPS confirmed that the odometer is recording miles. Finally, plugging in TuneECU confirmed that Rpm output from the ECU matches that displayed on the tachometer.
So what’s next? Well some of you who have managed to read this far (thanks!) may well remember a thread I started on the AF1 Forum regarding an in-built voltmeter (more here). The next phase is to have a few Futura inlays made (OEM quality or better) and offer the Futura inlay upgrade WITH the in-built voltmeter to fellow Capo owners at a decent price.
Keep checking the website for further information or send a message through the contacts page if this interests you.
