Replacement stainless steel fasteners

I really like fasteners, I hate rusty, corroded or damaged fasteners. There it is out in the open, plain and simple. I think there’s something tragic about lots of hard work going into an assembly, only for those old jaded screws/nuts/bolts/washers to go back into holding it together. On the other hand I’m not a fan of those OTT ‘custom fasteners’ – pike nuts etc or gaudy anodised fasters in any colour of the rainbow. For me, they are way overkill. What I want is an upgrade from the manufacturers items that were no doubt chosen with cost in mind. I like something that looks a little more up-market, in a material that is mechanically safe for the task in hand – safety has to override looks every time! They are there to do a job and complement the work that went into the parts they represent. 

What am I upgrading then?

So as part of the brake line upgrade, I’ve swapped out the stainless steel cap heads I had holding the hose supports to the fork leg with lovely Racebolt flanged hex head ones that better reflect the items originally fitted by Aprilia. A waste of money? Quite likely. Hell the cap head bolts did the job and were also in stainless steel, but they always looked like an obvious swap – a generic item – these new bolts look like Aprilia MIGHT have fitted them if build cost wasn’t so high on the list. In the end, these things are personal and one owners pike nut is another owner duct tape … they both hold things together I guess!
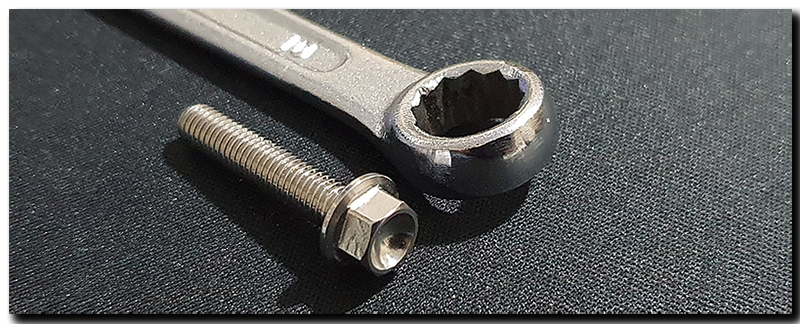
Ultimately I invested in a few little upgrades … the fork axle pinch bolts went from home-drilled cap-head to lovely ‘race spec’ (drilled for lock wiring!) flange bolts and the brake/clutch master cylinder cap heads were replaced for the the none-drilled versions. Last but not least, the rear axle adjuster bolts have been upgraded to stainless steel versions.

Conclusion

After putting a fair amount and time and effort into brake lines and calipers etc. it only seemed logical to add the finishing touches by upgrading certain fasteners to ones similar (but better!) to those fitted by the manufacturer. It’s not a cheap exercise by any stretch, but it does remind me of the old saying;

Don’t spoil the ship for a ha’p’orth of tar

SPOILER ALERT – It doesn’t have anything to do with ships! Ship was dialect for sheep. The meaning is, don’t lose a good sheep by not putting a protective layer of tar on wounds or sores to prevent infection by flies etc. Over the years folk have taken ‘ship’ literally and besides, it sounds far more grandiose to think that a cheap amount of tar could cause the loss of a very expensive ship! Here endeth the lesson … 🙂
New lines, new seals, new fittings, will it ever end?

Aprilia Caponord ETV1000 Rally-Raid Venhill Power Plus brake lines and stainless steel banjo boltsWell this little job just got a whole lot more involved and costly! The idea of having lovely clean and refreshed  calipers made me think about the old banjo bolts (M10x1) and bleed screws (M8x1.25) … OK, so new stainless ones were ordered from Racebolt, that’s fine. Then it got me thinking about the old tarnished hydraulic hose ends … sigh … OK, so new hoses as well then! 
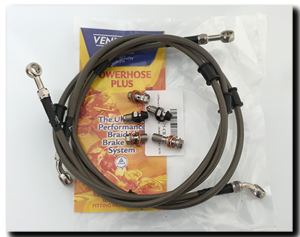
I went for the ‘Powerhose Plus’ range of hoses and fittings from Venhill down in Surry. I chose ‘carbon’ grey (smoked translucent sheath that shows the hose weave below) with all fittings in stainless steel. I really like these hoses because the end fittings can be rotated – thereby reducing twist in the hose and allowing the hose to sit naturally. This is something I hate with other swaged hoses. With that type, I have nearly always had to induce an amount of twist in the hose to get one banjo to fit the caliper or reservoir. Fair to say, I like neat hoses (and wires!) and I have a smattering of OCD about me when it comes to symmetry … both left and right hoses will HAVE to mirror each other!

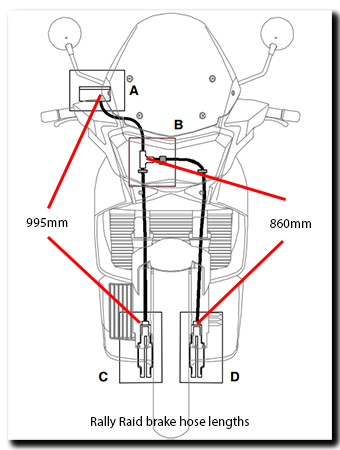
Aprilia Caponord ETV1000 Rally-Raid front brake hose lengthsThe standard hose assembly is  a single hose from the reservoir to a T-piece just below the lower fork clamp, from there a single hose down to each caliper. To replicate this was actually more expensive than using two individual lines from the brake master cylinder. So that’s what I went with – A double banjo bolt at the reservoir and two lines to the calipers using 2 x 45º banjos at the reservoir and 2 x straight banjos at the calipers. For the Rally-Raid the Venhill right hand line (as sat on the bike) is 950mm long and the left hand line is 1,100mm, these will need to be slightly shorter for the standard Caponord. The important point is that the lines plus fittings have to be long enough so that no part of the line, banjo-to-banjo is under tension when the forks are fully extended.

The lines came with three hose support grommets each, and I ended up removing one as it was not needed. Both lines use one grommet located within the existing support grommet that fits in the plastic tray below the headstock, the second is used within the P-clip bracket on the mudguard fixing screws, so two per line (see pics below). The third I used to help buffer the left hand line up at the handlebars … hopefully I’ll get around to designing and printing a 3D bracket to make this support look more ‘factory’ and finally the third support on the right hand line was removed.

So with the lines sorted it was time for the calipers. The left one was removed, stripped and cleaned with Gtechniq W6 Iron and general fallout remover … a rather pungent and powerful liquid that does what it says – strips off 95% of the dirt in one go. Use in a well ventilated place with gloves and goggles, this is nasty stuff! After that, the pistons/seals were stripped out and everything zapped in the ultrasonic bath for a couple of 20 minute cycles until totally clean. Once dry, everything was put back together with new seals, O’ring and bolts (2x 40mm, 1x 35mm). Once everything was back together it was time to bolt the caliper back to the fork leg (50Nm) and have a nice warm brew before starting all over again with the right one.

Conclusion

In all fairness, I couldn’t get over how good the old seals were after 115K+ miles and almost 20 years. The pistons and springs cleaned up beautifully and looked almost new and the anodising inside the bores was hardly marked – totally amaze-balls when I think how badly some Japanese calipers fair after only a couple of winters. I honestly think it is all down to the coating on the pistons and the anodising of the casing that make the difference. As for the cleaning process … I got there in the end! Brake calipers are probably the worst thing to clean on any bike and unfortunately there is no getting away from good old elbow grease … well that and a really aggressive cleaner made for the job! The ultrasonic bath put the icing on the cake, but in all honesty wasn’t strictly necessary, but did remove a little more dirt and added  extra sparkle.

Below is a selection of pics showing hoses and before/after shots of the calipers along with a couple of shots that highlight the kind of crap the Capo put up with for 10 years on a certain Italian road …

The Scottoiler is dead, long live the Scottoiler!

Aprilia Caponord ETV1000 Rally-Raid ScottoilerI posted about this thing in 2012 and planned for it’s replacement in 2013.
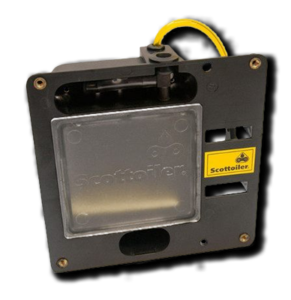
Like it or not though,  it is now a rather pants 2020 …. and  I have finally replaced the ageing and somewhat cantankerous Scottoiler VSystem and HCR (High Capacity Reservoir). With a total of 19 years, four bikes and somewhere in the region of  360,000 miles under its belt it was definitely time to replace it. To be fair, the last 5,000 or so of those miles it has only been along for the ride as I had finally turned it off sometime late last year due to it functioning in ‘all or nothing’ mode and ‘all’ really was quite a bit of oil to go sloshing around the back wheel! The RMV (Reservoir Metering Valve) had been refurbished back around 2013-14 and back then, the diaphragm was already getting a little stiff. I guess like my old joints, one day it just stopped flexing at all.

In the big scheme of things, this package has only cost a couple of pennies a day and given sterling trouble-free service for 99% of its days, so there is only one clear viable replacement in my books – another VSystem and HCR. I did look at the very 2020’s techie ESystem but frankly, I couldn’t justify the 2.5x price and having to fiddle with yet more wires and mount yet another ‘control box’ on the handlebars somewhere. No, the VSystem works well and will simply be a plug-in replacement and that suits me just fine. Total cost for both parts in the UK came to £127.96 and that is not a huge hike in price over almost 20 years.

Put it another way. A DID 525ZVMX chain costs £100-£110 ish to replace and by my rough calculation the Scottoiler has saved me the cost of at least three chains, probably more during its time on my bikes. So not only has it long since paid for itself, it has also saved me a tidy sum in sprockets and the time and effort to replace them. I can comfortably live with that.

I’ll end with a brief explanation of how I mounted the HCR to the Caponord. Firstly though a disclaimer – Scottoiler do not list the HCR as compatible with the ETV1000. If you do decide to install one, it is entirely at your own risk. Personally, I am more than happy that the installation I have is safe, secure and allows the system to function as it was designed to. This is how I did it.

Using the template (download here) I have made a mounting bracket from 4mm thick aluminium plate. In the pictures below you will see the plate in perspex – this was the ‘sanity check’ test piece to confirm the drawing was correct before committing to cutting metal. This piece is mounted by two M6x20 countersunk screws, washers and nyloc nuts through the existing ‘number plate’ mounting holes in the mudguard. The HCR is mounted to this bracket by two M6x30 cap head screws, washers and nyloc nuts and a third M6x30 through the pannier frame/mudguard.

On the Rally-Raid or any Capo with the Givi pannier rack the rear brace attaches to the mudguard and provides the 4mm standoff for the HCR bottom mount to bolt through (M6x? cap head, washer and nyloc nut) – if you don’t have this bar, then you need to provide a spacer between the mudguard and HCR – a couple of M6 penny washers will work fine. You will need to fit the RMV to the HCR before fitting the whole assembly to the mudguard as there is not enough room once the HCR is fitted on its own. After that, just follow the instructions provided by Scottoiler regarding filling, mounting the feeder pipe and attaching the RMV to the vacuum system. The only additional thing I did, was drill the mudguard so I could feed the oil/vacuum pipes through to the subframe rails and hide them out of the way.


Well I never …. I didn’t expect that!

About six weeks ago Beasthonda pointed me in the direction of a Rally-Raid rider saddle up for grabs – brand new from Greece. Well, a couple of weeks ago it arrived and I gave it a quick once over. Since then it has sat in the corner looking pretty. Until today.

I took it to the garage and was just about to put the box away, when I glanced at the saddle on the shelf waiting to go back on the bike.Something wasn’t quite right, so out of the box came the new saddle, and voila ….. it turn out it’s a low-saddle. Yes, AP8793685 – what a surprise! I’ve always been on tipie-toe on the Raid, so I’m looking forward to at least trying the low saddle just to see what the trade off is. My guess, better foot-to-floor feel but knees getting bent more when riding, which will be the killer as my knees don’t do so well these days even with the standard seat. But for local/commuter riding it might be just perfect, the swap saddles for the long-haul rides.


It had to be done ……… but

Aprilia Caponord ETV1000 Rally-Raid valve service and cam covers replacedAs I sit looking at the vast expanse of white in the WordPress editor window, fingers poised over the keys and acutely aware of the aches in my fingers and wrists and subtle waft of soap barely masking the hint of worn out engine oil clinging stubbornly to the creases  in my old hands, I think to myself ….. aaagggghhhh why did I bother!

Yes, another Caponord service is over – with a valve check. Don’t get me wrong, everything went well, couldn’t have gone better in fact. Air/Oil filters and engine oil, plugs, hoses, fuel tank drain lines etc … are just perfect … but this time I had to fight my way in to check the valves, last done sometime when Crackerjack was on black and white TV’s – or so it feels.

Don’t get me wrong it’s not a hard job, just a fiddly one, especially the front cam cover bolt beautifully obscured by the coolant thermostat, oh and the buggeroo of a screw at the front of the cam cover, behind the radiator and below the finger shredding plastic mount for the front coils … otherwise, all good.

It’s none of that that bothers me in reality. It’s the fact that when you get in and measure the valves after what seems like way too many miles since the last visit, they’re all bloody fine! Couldn’t just one be out, just one require a shim change just to make the whole visit worthwhile – please! Oh well, I guess I had to console myself with fitting the powder coated cam covers and savouring the moment in the golden hour at the end of a beautifully warm day. 

Time on my hands …..

Aprilia Caponord ETV1000 Rally-Raid When a chicken damages your front mudguard, the day doesn't end so well for the chicken!

It’s fair to say that these strange and worrying times will touch all of us in some  way or other, so may I firstly send each and everyone of you all my best wishes as we each deal with the Covid-19 pandemic. That said, life still moves on and this site is about the beloved Caponord ETV1000 we are lucky enough to enjoy, so it’s content will stay focused to that end. 

Recently the fantastic company I work for has taken the difficult decision to furlough us until the end of May, but the flip side of this particular coin is that I’ll now have a lot more time to add new material to the website and spend some well needed hours spinning spanners and generally giving the Capo the TLC it so richly deserves. So please, stay safe, and pop back once in a while and see what’s been added! 

First on the list ……. the front mudguard. I’d only had the Capo a year or so, when one fateful day a rather inquisitive chicken decided the front mudguard was a smashing place to perch, but not very grippy. So after lots of slipping around and trying to dig its claws in, it gave up and flapped away in a huff leaving nice scratches in the surface of the mudguard. Since then, a coat of black bumper polish every now and then has gone some way to masking the marks, but it needs applying every few weeks to maintain the effect. Later that fateful day, the chicken mysteriously decided to perch inside a hot oven with some lovely roast spuds ….. and close the door. Who knows what goes through a chickens mind eh!

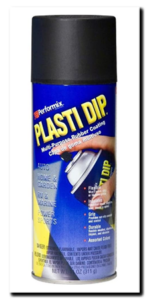
Last year … yes, last year (the shame of waiting so long!), I got hold of a rattle-can of ‘Plasti Dip’ satin black. This stuff is quite interesting, it sprays like a paint but can be peeled off later like a vinyl wrap. Just do a search, there are loads of YouTube videos about this stuff. So the plan is, off with the guard, a good wash and degrease then when thoroughly dry, a few coats of Plasti Dip – if I don’t like it, simply peel off re-polish and put it back on the bike – nothing lost. That’s the cunning plan anyway …

Next on the list …. another little update to the 4D Systems screen software! An extra page has been added that now allows control of heated grips and seats. Here’s a little video of it in action … again, it’s a work in progress and will have a couple of graphic tweaks and an extra function added into the software, but for now it’s a working prototype with three PWM (Pulse Wave Modulation) outputs (one per heater set) that will drive a high power circuit controlling the heater elements. These circuits are capable of handling 12A each, so more than tough enough for grips/saddle heaters.
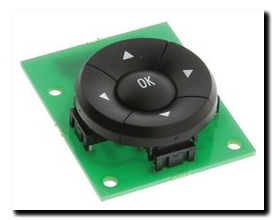
It uses the 5-button switch assembly so that the grips can be adjusted on the fly, rather than have to use the smartphone app like the other info pages. The basic functions are:

  • Press and hold OK to access the screen or return to main screen
  • Use the UP and DOWN buttons to select the heater you want to adjust
  • Use the LEFT and RIGHT buttons to adjust the heat settings – a single press adds/removes 1 block (10%) while press and hold a button ramps up or down until released
  • Double click the LEFT or RIGHT button to set all heaters to 0% or 100% instantly. When set to 100% there is a five minute timer, then the grips return to preset values – this is ideal as a pre-heater on wintry mornings!
  • Finally, Double click the OK button to return all heaters to preset values
  • In-built safety cuts all heaters when the ignition is turned off

Updates in the pipeline …… addition of a settings page in the smartphone app to allow some flexibility. For example – a timer when the ignition is turned off, so the grips can remain live for a few minutes (like the Oxford grips do) … and the ability to inhibit the pillion heater completely if you never carry a pillion or feel the need to heat luggage you have strapped on!

Time at the bar(-end) gentlemen please!

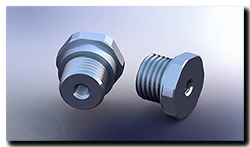
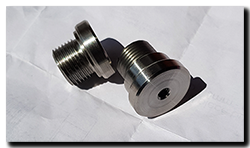
Aprilia Caponord ETV1000 Rally-Raid bar-end weight mount stainless steelAs Guinness said, “Good things come to those who wait” …… and boy have I waited! When the new grips went on in late November, they were accompanied by the 3D printed temporary bar-end mounts. The clock was ticking, I had to get the grown-up adult versions (stainless steel!) made up asap as I’d no idea how long these things would hold up. In early January someone stepped in to do the deed.
Unfortunately, they never appeared no matter how much cajoling and nudging I tried. Finally, after 4 months I was out of time and the Capo had to return from Italy sporting the plastic 3D printed ones. I shouldn’t have worried though, they held up just fine!

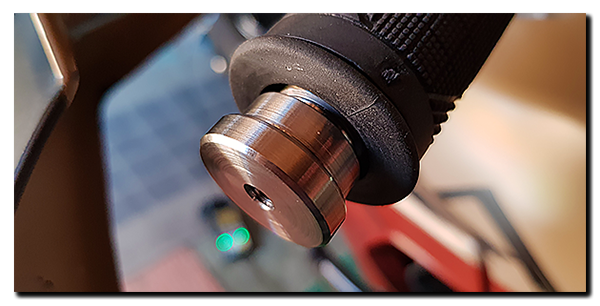
Aprilia Caponord ETV1000 Rally-Raid bar-end weight mount stainless steelSo just when I was giving up on ever seeing a set, a mate offered to help, and in the blink of an eye made these beauties! They fit perfectly and the finish is brilliant – what more can I ask for? So a huge ‘Thank you’ goes out to Jason – stand up, take a bow, don’t be shy fella! The eagle-eyed will notice a change from the rendering (and drawing) in that the flats (for socket or spanner) were left off. This was to reduce machining time and also because they only really need to pinch up – I’m not torquing the nuts off an axle here!
Of course, once these were in the pipeline, I told the other guy ……… who then got all stroppy saying the material had been ordered …… this is after 5 months of waiting! Sheesh some folks. 🙄 Aprilia Caponord ETV1000 Rally-Raid bar-end weight mount stainless steel


The blip is back!

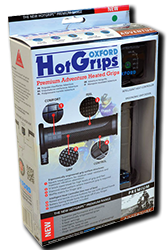
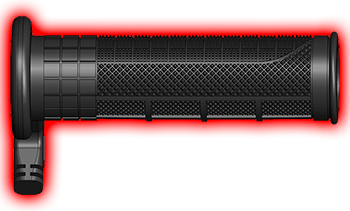
After a couple of rides, here’s the verdict on the Oxford Adventure heated grips – utterly Fantastic! Not only are they awesome in their toastiness, they really do help my old wrist as well. The extra diameter and better texture compared to the Ariete grips is lovely!
One thing lacking in my riding over the last few months has been blip-ability, the quick tweek of the wrist to grab a few revs … almost every downshift became a novice-style, crunchy-clunky affair, blips either non-existent or late. The head was doing the throttle blippy thing but the wonky wrist just couldn’t or wouldn’t play ball. Fair to say my blip-mojo was lost in sore tendons and swollen joints.

Now with fatter grips I’m chuffed to say my blip-mojo is back with a vengeance, sharp, snappy downshifts complemented with slick as Slick-50 on Teflon clutchless up-shifts as we slice through bend after hairpin bend. If the grin got any wider I’m sure the top of head would have fallen right off. At last, me and the gearbox are best mates again!

But that’s only half of it – These things work superbly as HEATED grips as well! With the days now struggling to reach 10-12C and wearing summer gloves, it takes but a couple of minutes at 100%, then swiftly backing the heat down to 40% before my fingers catch fire! That’s way better than the Aprilia grips ever performed. I do wonder if a big part of the Aprilia grips poor performance was not only down to the high-resistance heaters, but also the feeble wiring to the grips. I swear that stuff is rated to little more than 5 Amps, maybe 8 Amps on a good day with the wind behind it! Either way, they’re history now after a sterling 9 years service and I’m looking forward to seeing how well the Oxford grips last. Bring on a January ride through Switzerland ……. 😯 

3D speedo sensor revisited

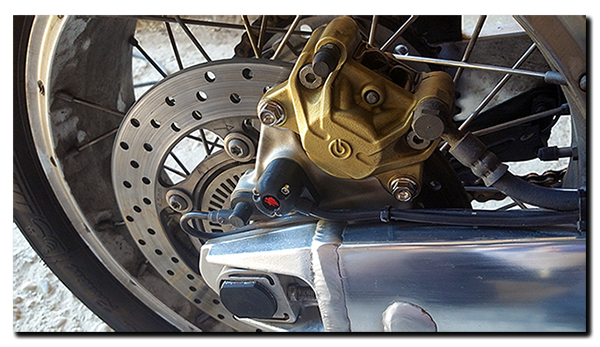
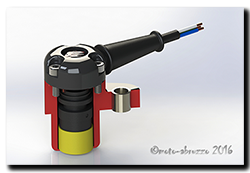
Aprilia Caponord ETV1000 Rally-Raid 3D printed Speedometer sensor AP8124985 1GP7001 HoneywellYesterday I was asked about the 3D printed speedo sensor case and I couldn’t believe that it’s been almost six months since last mentioning it and about nine months since fitting it. So how is it holding up? Well just fine and dandy thanks for asking!

So far, It’s been through a long 40C summer and some damn cold nights of recent. Heavy rain and a decent shake down over something like 12,000 miles including some off-road, add up to a pretty good trial all-in-all. The plastic is holding up nicely with no signs of cracks, warping or sun-fade, so it looks like the Color-Fabb nGen material is a good choice for use on the Capo and that is backed up by the frame bungs I made last year – all as good as the day they were fitted.

I’ve put a pdf drawing of the main body in the CAD/3D downloads area so you’ve some idea of the dimensions of the speedo sensor. Fitting a sensor from an alternative Aprilia is of course an option, the only real issue being the tight bend in the cable to make it fit, not particularly nice, but functional I guess. Also, is the cable long enough and does it have the right connector? I’ve no idea. Some may want to go with a different sensor altogether, fine in principle as long as it uses the same voltage/current range and the signal is compatible with the dashboard. then of course you have to make it fit, hopefully the drawing will help a little here as it gives depth, diameter and mounting hole location for comparison. Again there is the issue of cable length and connector …….

Aprilia Caponord ETV1000 Rally-Raid 3D printed Speedometer sensor AP8124985 1GP7001 HoneywellJust a word of caution though, the standard sensor is a snug fit in the caliper mount and cannot in any way move into the wheel. Can the same be said of an aftermarket sensor and its modified fitment? The consequences of something possibly working loose and jamming the back wheel don’t bear thinking about!

Of course I went for a third option, 3D printing. I’d originally thought of the case as reusable, but in the end, given the few pennies it costs to print I made it a semi-sealed item. The sensor is installed with sealant and after soldering the wires in place, the cap is also back filled with sealant and screwed into place. If and when it fails, I’ll just remove reusable bits (boot, screws etc) and print/assemble another one. Total cost (sensor, case, screws, wire, boot & connector) came in under £30 – Granted about the same as some RSV/SL sensors on ebay …. but that’s new not second-hand!

Fitting the Oxford Adventure heated grips

I figured it would be a good time to take the Capo off the road and replace the heated grips when it next rained …… and oh boy is it raining! 48Hrs now and another 24 to go if the met folk are to be believed. Plenty of time then to get the deed done, with a hot brew and cold beer somewhere along the way.
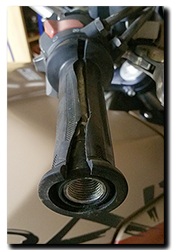
This morning I spent a good hour doing a detailed write-up, only to realise that quite frankly it would bore you to tears …… fitting the Oxford Adventure heated grips is nicely covered in the enclosed instructions and on umpteen websites and no doubt a zillion YouTube video’s. What YOU need is the specific details and issues relevant to fitting them to Rally-Raid biconical handlebars – more specifically, Rally-Raid bars that already have Aprilia heated grips fitted, so here goes.

Aprilia Caponord ETV1000 Rally-Raid Oxford Adventure heated grips OF690The left-hand one is a doddle. The Aprilia grip is held on by two screws and no adhesive, so it simple slides off once all the relevent bit’s and bobs have been removed first. The right hand one is a different matter though. For this one I had to cut off the rubber grip, peel off the old heater element and then cut/Dremel the large plastic disk (switch-gear end) and raised ridge (bar-end weight end) to make one continuous 26mm diameter smooth tube.

Now the Oxford Adventure grips are 132mm long (can be cut down to 122mm) and I fitted them untrimmed, but that does mean that spacers are then required for the bar-end weight mounts to fit properly and not foul anything. For the left hand side this is 1.5mm thick (22mm OD, 18mm ID). However the right-hand is a different story. This needs the original Aprilia 3mm spacer replaced with a 7mm one – same OD and ID as the left one. But with this in place, the amount of lost thread on the mounting is  now a bit worrying, so I drew up a Aprilia Caponord ETV1000 Rally-Raid new handlebar mounts for bar-end weightsreplacement mounting in CAD and will get a local machine shop to knock a couple up. Meanwhile a 3D printed spacer is in place and works fine for now.

So now they’re on and look good and they feel great, no more finger tips pushing into the back of my palm with summer gloves on and I swear my wrist is already thanking me for the reduced torque on the throttle. All that’s left to do now is install the controller and wire everything up ….. just follow the instructions in the box!

Why not just cut the grips down I hear you cry. Well to me, cut down grips look just that – cut down. They lose the raised ridge at the end and scream out butchered! Besides it’s bloody hard to get a perfect cut, it always seems to go wibbly-wobbly somewhere. Not only that, but I wanted the extra width to make using winter gloves more comfortable. The original grips (and Ariete) are just too narrow (107mm usable) to be comfortable with my BKS winter gloves, leaving Mr Pinky out on his lonesome on the bar-end weight! Now the whole finger-family can be snug and warm on the extra width the Oxford grips give.

UPDATE – The whole kit is now in and working a treat, and boy are they toasty compared to the Aprilia ones! If I have one issue with them, it’s the length of the wires ….. I found that the wiring provided isn’t exactly generous and needed very careful routing to make sure the three connectors could sit comfortably behind the headlight and the main loom then reach back to the battery. Given that they are sold as ‘Adventure’ grips, am I cynical for thinking they might be aimed at adventure style bikes with higher/wider handlebars etc? Come on Oxford, a few extra inches of cable on the looms won’t break the bank surely!